
Building a Raspberry Pi RFID Reader
Welcome to Engineering Evening! Today, we’re diving into an exciting project that combines the power of a Raspberry Pi with an RFID-RC522 sensor. We’ll guide you through the process of connecting the RFID sensor to your Raspberry Pi via GPIO pins and introduce you to the MFRC Python code package to seamlessly interact with the sensor. Let’s get started with this fascinating venture into RFID technology!
Requirements:
- Raspberry Pi 1B+ (or newer)
- Micro SD Card with Raspberry Pi OS installed (16GB+ recommended)
- RFID-RC522 sensor module
- Jumper wires (female-to-female)
- Breadboard (optional, for easy connections)
Note: We support our efforts bringing you these free tutorials through affiliate links. These links are affiliate links which means we do get paid if you click on them and make a purchase. These are the exact products we ordered and used, so you and rest assured there’s no funny business of linking to junk products.
If you appreciate our content, please support us by using our links.
Step 1: Gather Your Materials Before we embark on our RFID adventure, make sure you have all the necessary components ready. For the duration of this tutorial we’ll use a Raspberry Pi 3 as the brains of our operation (any Raspberry Pi 1B or newer will work following the same steps), and the RFID-RC522 sensor is our key to RFID communication.
It is important to note that RFID is a wireless technology and as such, it only works with specific frequencies. Each reader and RFID tag is tuned to a specific frequency, so not all tags will work with all readers. For this project, the sensor we will be using operate at 13.56 MHz which means the tags we try to read also need to be 13.56 MHz tags.
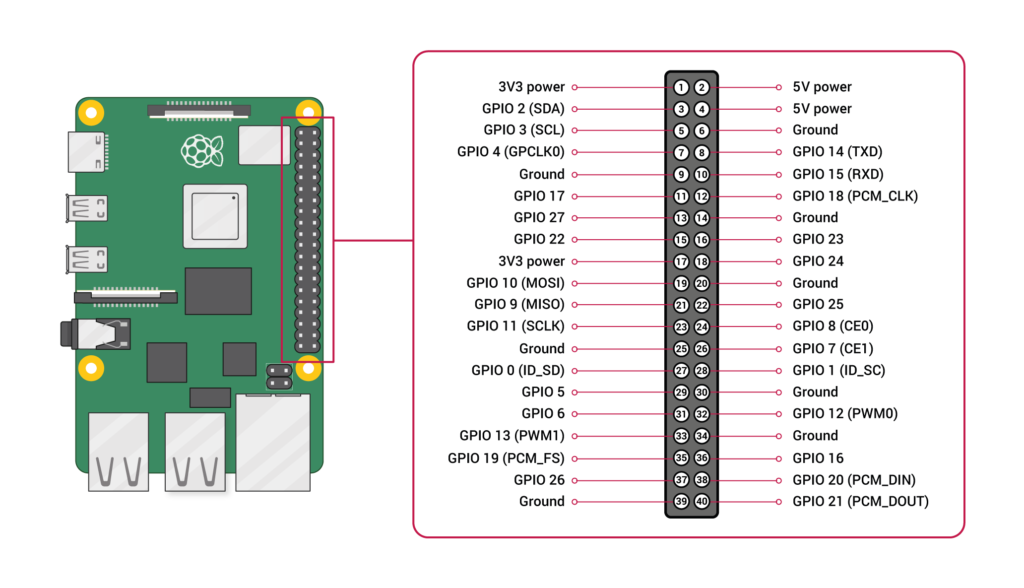
Step 2: Connect the RFID-RC522 Sensor
- Place your RFID-RC522 sensor on a breadboard (if available) for easier connections. Ensure that the sensor’s pins are accessible for wiring.
- Connect the RFID-RC522 sensor to your Raspberry Pi as follows:
| RFID-RC522 Pin | Raspberry Pi GPIO Pin |
| 3.3V | 1 (3V3 Power) |
| RST | 15 (GPIO 22) |
| GND | 9 (Ground) |
| MISO | 21 (GPIO 9) |
| MOSI | 19 (GPIO 10) |
| SCK | 23 (GPIO 11) |
| SDA | 24 (GPIO 8) |
- Double-check your connections to ensure they are secure. This wiring establishes the communication between the Raspberry Pi and the RFID-RC522 sensor.
Step 3: Set Up Raspberry Pi
- Ensure your Raspberry Pi is powered off.
- Insert the microSD card with the Raspberry Pi OS installed.
- Power up the Raspberry Pi.
Step 4: Install the SPI-Py Library
- Open a terminal on your Raspberry Pi.
- Install the SPI-Py library, which will enable communication with the RFID-RC522 sensor:
pip install spidevStep 5: Download the MFRC Python Code Package
- Clone the MFRC Python code package from GitHub:
git clone https://github.com/mxgxw/MFRC522-python.git*Alternatively, you can visit the repository in a web browser and download a copy of the code: https://github.com/mxgxw/MFRC522-python. After downloading, you will need to unzip the file.
Step 6: Test the RFID Reader
- Navigate to the MFRC522-python directory:
cd MFRC522-python- At the time of writing, the MFRC522-Python code is written for Python2 which has been retired and replaced with Python3. Run the following code to install 2to3 (the Python update utility) and update the code to Python3:
sudo pip install 2to3
2to3 -w *.py- Once you are done converting all of your files from Python2 to Python3, open the file in Raspberry Pi’s Python editor, Thonny (Raspberry Pi menu -> Programming -> Thonny) and use the controls within Thonny to run the file.
*Alternatively, you can run the Read.py script that came in the MFRC522-Python code package from the command line:
python Read.py- Hold an RFID card or tag close to the sensor. You should see the RFID card’s data displayed in the terminal (output to the screen).
Conclusion Congratulations, you’ve successfully set up a Raspberry Pi 3 to connect to an RFID-RC522 sensor using GPIO pins and used the MFRC Python code package to interact with the sensor. This project opens doors to various applications, from access control systems to inventory management.
The MFRC Python code package also includes a Write.py example file that you can use to learn how to write your own data to your RFID tags.
Experiment with different RFID cards or tags and explore how to use the data obtained from the sensor for your specific needs. With this powerful combination of Raspberry Pi and RFID technology, your engineering possibilities are virtually limitless. Happy tinkering!
Note: Remember to respect local regulations and privacy when using RFID technology, especially in applications involving personal data or access control.