Create a Looping Video Display with Raspberry Pi
Welcome to Engineering Evening! So many of my projects involve Raspberry Pis and many of them need to have videos that start automatically when the Raspberry Pi is booted.
In this guide, we’ll be diving into the world of Raspberry Pi 3 and VLC Player to create an eye-catching automated looping video display. With just a few simple steps, you’ll have a mesmerizing visual experience that starts playing in full screen as soon as your Raspberry Pi boots up. Let’s get started on this exciting engineering journey!
Requirements:
- Raspberry Pi 3, 4 or Zero 2
- MicroSD card (16GB+ recommended)
- HDMI display (a monitor or television)
- HDMI cable
- Stable internet connection (for software installation)
- USB keyboard and mouse (for initial setup)
Note: We support our efforts bringing you these free tutorials through affiliate links. These links are affiliate links which means we do get paid if you click on them and make a purchase. These are the exact products we ordered and used, so you can rest assured there’s no funny business of linking to junk products.
If you appreciate our content, please support us by using our links.
Step 1: Gather Your Materials Before we begin, make sure you have all the required components on hand. The Raspberry Pi will serve as the heart of your project, while a microSD card will house the operating system and video file.
Step 2: Prepare the MicroSD Card
- Download the latest version of Raspberry Pi OS (formerly known as Raspbian) from the official website and extract the downloaded file. For this to work best, select a 64-bit version of Raspberry Pi OS with a desktop environment.
- Insert the microSD card into your computer using an SD card adapter.
- Use the Raspberry Pi Imager or a similar tool to write the OS image onto the microSD card.
Step 3: Initial Raspberry Pi Setup
- Insert the microSD card into the Raspberry Pi.
- Connect your HDMI cable to the Pi’s HDMI port and the other end to your display.
- Connect a USB keyboard and mouse to one of the Pi’s USB ports.
- Power up the Pi by connecting a micro USB cable to its power input.
Step 4: Boot and Configure the System
- Once the Pi boots up, follow the on-screen instructions to configure settings like language, keyboard layout, and Wi-Fi connectivity.
- Open a terminal and update the system by running the following commands:
sudo apt update
sudo apt upgrade
Step 5: Install VLC Player (if VLC is not already installed)
Usually VLC player comes installed with Raspbian OS with a desktop environment. If so, skip to step 6.
- In the terminal, install VLC Player by entering the following command:
sudo apt install vlcStep 6: Autostart Script Creation
- Open a terminal and create a new autostart folder:
mkdir ~/.config/autostart- Create a new autostart script file:
nano ~/.config/autostart/autovlc.desktop
- Add the following lines to the autostart script to launch VLC Player with your video file in full-screen loop mode:
[Desktop Entry]
Type=Application
Exec=vlc /path/to/your/video/file.mp4
Replace /path/to/your/video/file.mp4 with the actual path to your video file.
You can add additional command line options after the video file location such as --loop to loop the video or --fullscreen to load the video in full screen mode. Example:
[Desktop Entry]
Type=Application
Exec=vlc /path/to/your/video/file.mp4 --loop --fullscreen
Refer to this “Other Options” section of this VLC documentation page for additional options you can set when launching VLC:
https://wiki.videolan.org/Documentation:Command_line/#Other_Options
Step 7: Save and Reboot
- Press
Ctrl + X, then pressYto confirm and save the autostart script. - Reboot your Raspberry Pi:
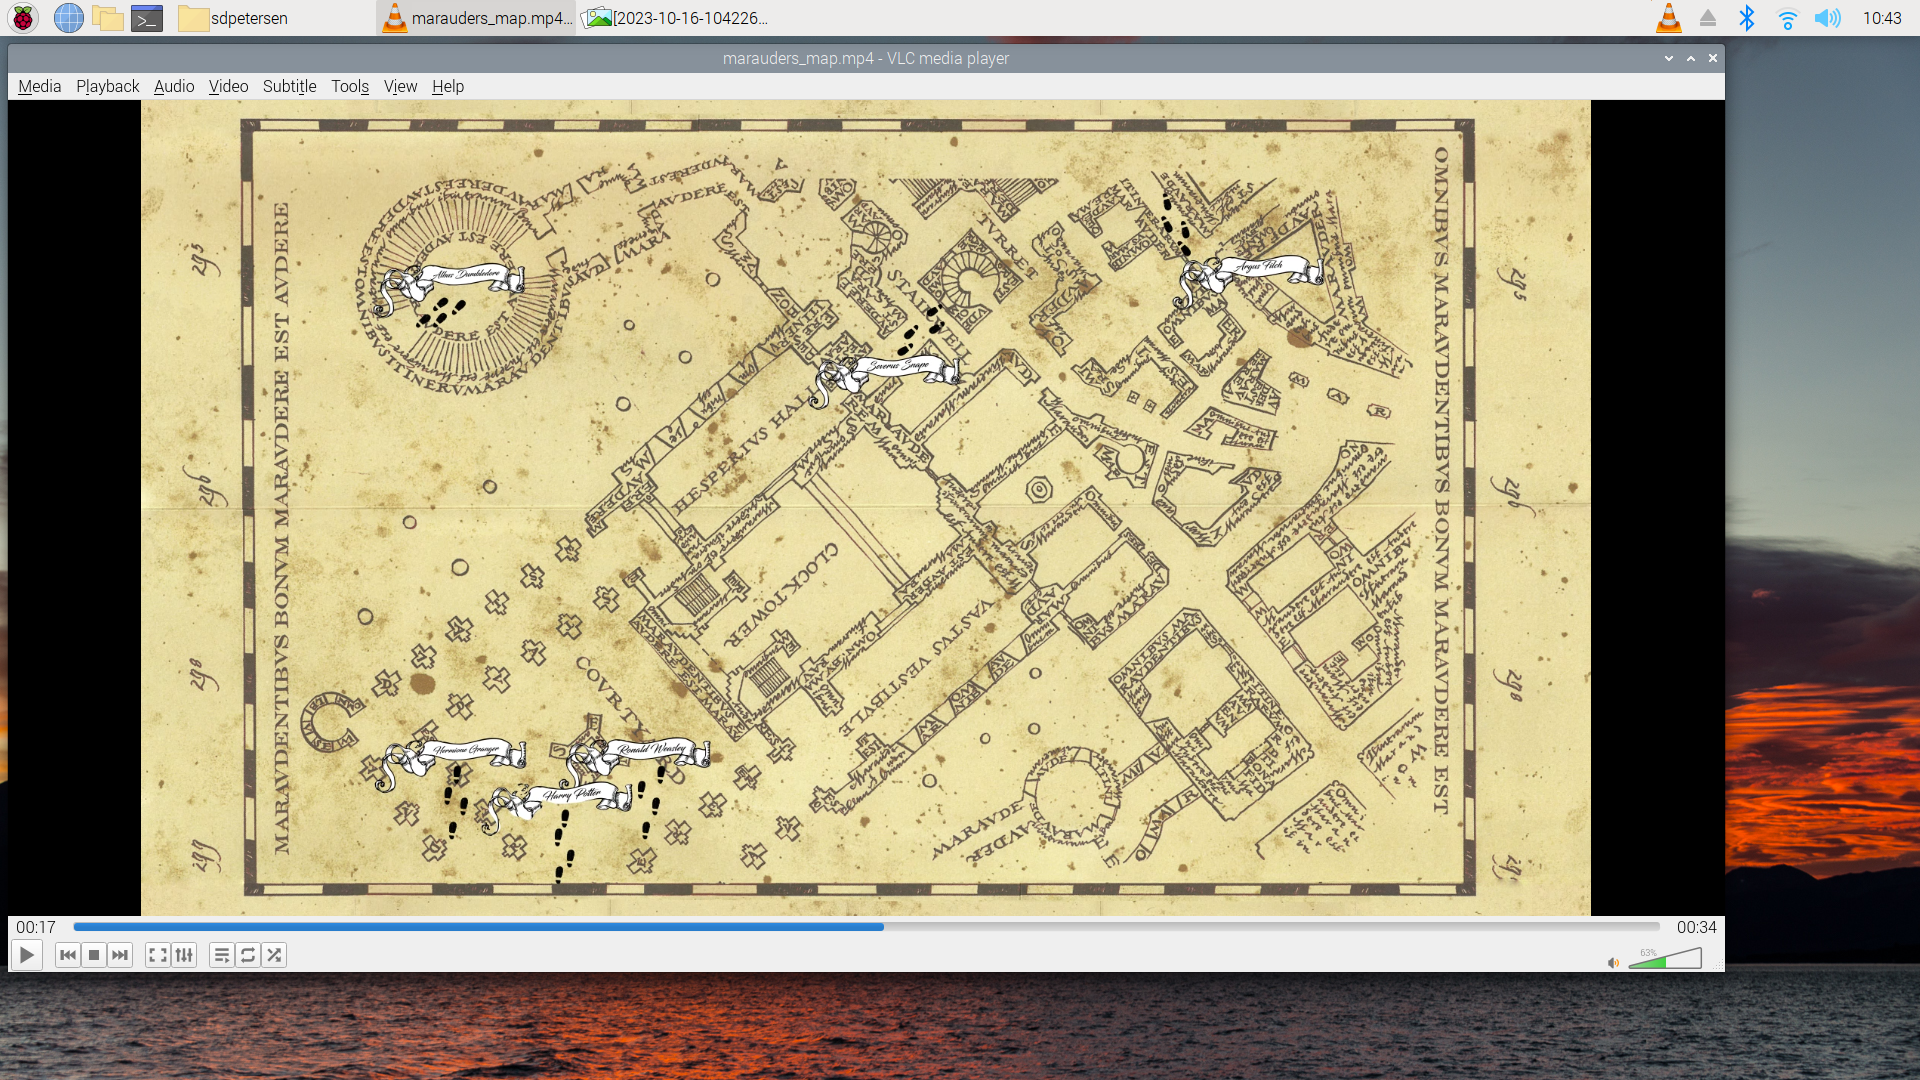
sudo rebootStep 8: Experience the Looping Video Display!
After the reboot, your Raspberry Pi will automatically start playing the video in full-screen loop mode using VLC Player. Sit back and enjoy your very own automated video display!
Conclusion
Congratulations on successfully setting up an automated looping video display using Raspberry Pi and VLC Player. By following the steps in this guide, you’ve harnessed the power of these technologies to create an engaging visual experience that can find applications in various settings, from digital signage to art installations. Now you have the tools to explore even more possibilities and expand your engineering horizons. Happy experimenting!